

フロント分からん過ぎて将来が不安になったので、とりあえずGatsby触ってみようと思い環境構築してみました。
WSL2(Ubuntu) + Dev Container + GatsbyJS + Tailwind CSS + TypeScriptという構成でやっていくので、興味がある方はぜひお試しください!
※筆者の実行環境はWindows11です。
WSL2(Ubuntu)のインストール
Ubuntu上に構築するため、まずはWSL2(Ubuntu)をインストールします。
※おま環かもしれませんが、Windows上に構築したGatsby開発環境だとビルド各種がめちゃくちゃ遅かったです…
PowerShellを起動して以下を実行
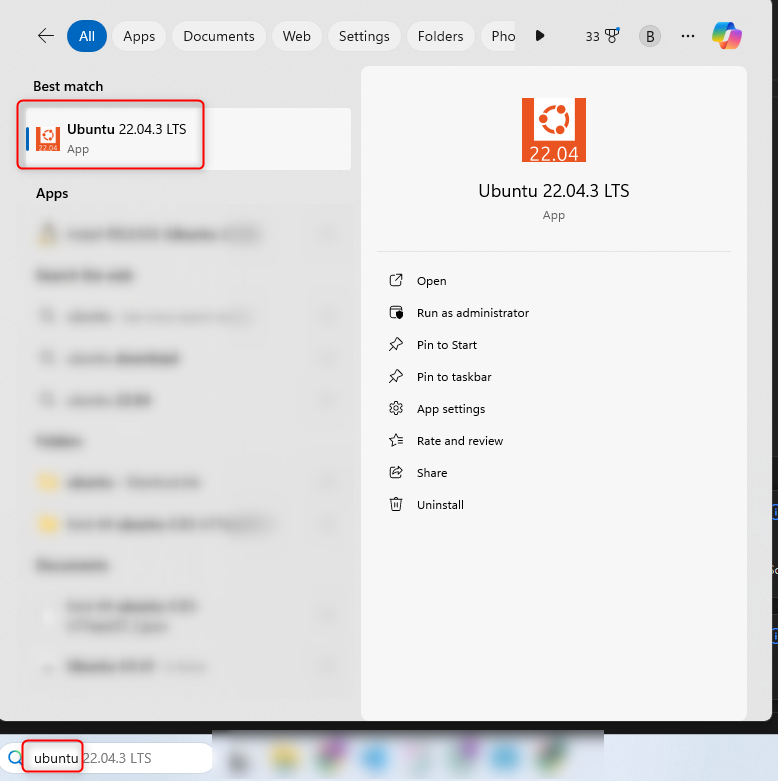
wsl --install -d UbuntuEnter new UNIX username:と表示されるので、適当なユーザー名を入力する
Enter new UNIX username: ubuntuNew passwd、Retype new passwordと表示されるので、適当なパスワードを2回入力する
New password: hoge(入力中は見えない)
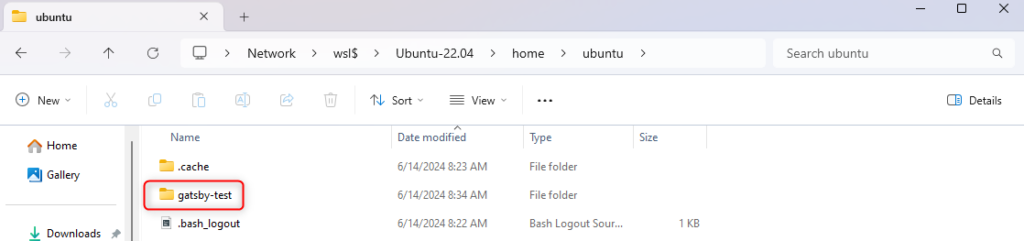
Retype new password: hoge(入力中は見えない)Windowsのエクスプローラーを開き、アドレスバーに「\\wsl$」と入れて検索
画像のようにUbuntu…が表示されていればOK

UbuntuにDockerをインストール
Ubuntuを起動する
dockerのセットアップスクリプトを取得
curl -fsSL https://get.docker.com -o get-docker.shセットアップスクリプトを実施
※sudo~を入力するとパスワードを聞かれるので、Ubuntuインストール時のパスワードを入力
sudo sh get-docker.sh
password for ubuntu:
sleep 20と表示されたら、インストール完了まで待機
結構長いので気長に待つ
WSL DETECTED: We recommend using Docker Desktop for Windows.
Please get Docker Desktop from https://www.docker.com/products/docker-desktop/


You may press Ctrl+C now to abort this script.
+ sleep 20
Ubuntuインストール時に作成したユーザーでdockerを実行できるよう権限を設定
sudo usermod -aG docker $USERPowerShellを起動して以下を実行
wsl --shutdown再度Ubuntuを起動して、dockerが動作することを確認
docker version以下のようにバージョンが表示されればOK
Client: Docker Engine - Community
Version: 26.1.4
API version: 1.45
Go version: go1.21.11
Git commit: 5650f9b
Built: Wed Jun 5 11:28:57 2024
OS/Arch: linux/amd64
Context: default
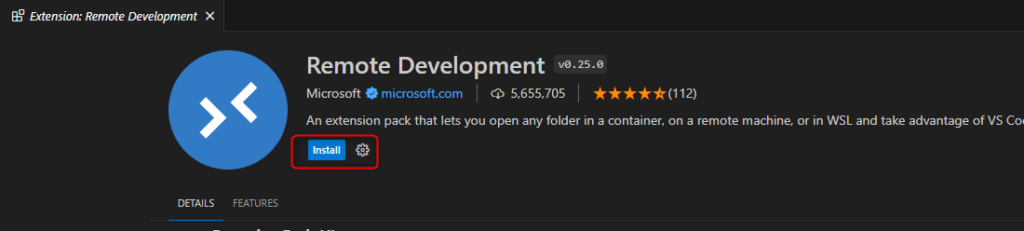
...VSCodeにDev Containerをインストールする
※VSCode自体のインストールは割愛します。
VSCodeを起動し、拡張機能の検索欄に「Remote Development」と入力
表示された拡張を開き、Installをクリック

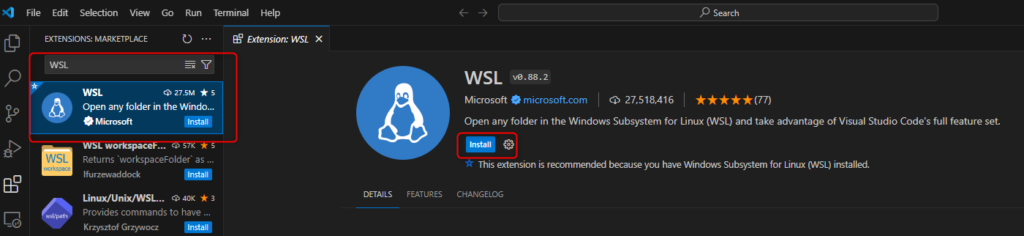
同様の手順で「WSL」もインストールしておく
※WSL(Ubuntu)上のファイルをVSCodeから編集する場合に必要、らしい
Dev Container用のディレクトリを作成
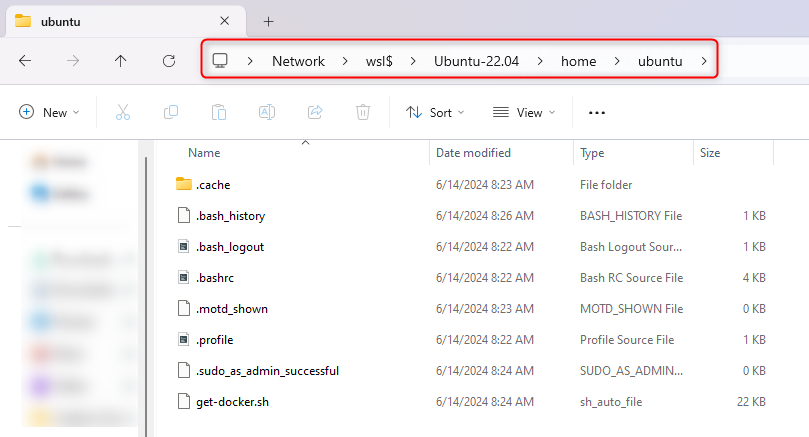
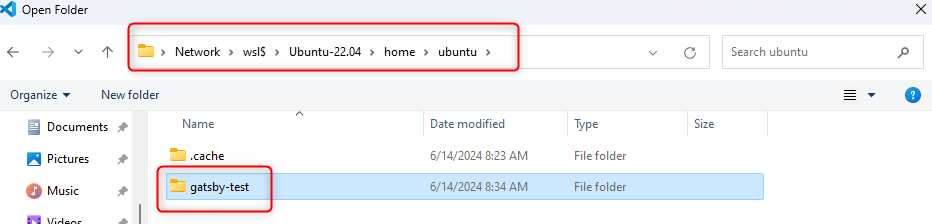
Windowsのエクスプローラーを開き、アドレスバーに「\\wsl$」と入れて検索
Ubuntu-2…が表示されるのでクリックして、パス「Ubuntu-2…/home/ubuntu(ubuntuインストール時に作成したユーザー名」へと進む
各種ファイルを格納するディレクトリを作成
※作成したディレクトリへのショートカットをWindows側のデスクトップとかに置いとくと後々楽
Dev Container用のファイルを準備
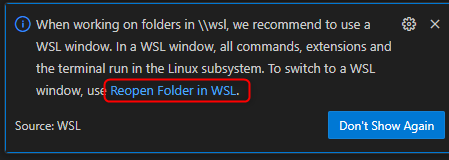
VSCodeでDev Container用のディレクトリを開く
VSCodeの右下あたりに以下が表示されたら赤枠内のリンクをクリック
以下の改装でディレクトリとファイルを作成する
gatsby-test
└── .devcontainer
    ├── devcontainer.json
    └── postCreateCommand.sh
devcontainer.jsonに以下を記載
※extensionsはvscodeの各種拡張機能です。個人的に必要なものを詰め込んでるので、不要なものは削除してください
{
	"name": "Node.js & TypeScript",
	"image": "mcr.microsoft.com/devcontainers/typescript-node:1-20-bullseye",
	"postCreateCommand": "/bin/sh .devcontainer/postCreateCommand.sh",
	"customizations": {
		"vscode": {
			"extensions": [
				"bradlc.vscode-tailwindcss",
				"oderwat.indent-rainbow",
				"ionutvmi.path-autocomplete",
				"ecmel.vscode-html-css",
				"mrmlnc.vscode-autoprefixer",
				"phind.phind",
				"ms-azuretools.vscode-docker"
			],
			"settings": {
				"terminal.integrated.shell.linux": "/bin/bash"
			}
		}
	}
}
postCreateCommand.shに以下を記載
npm install
npm install -g gatsby-cli
Dockerコンテナを作成
ひとつ前の手順で作成した設定ファイルでDockerコンテナを立ち上げます。
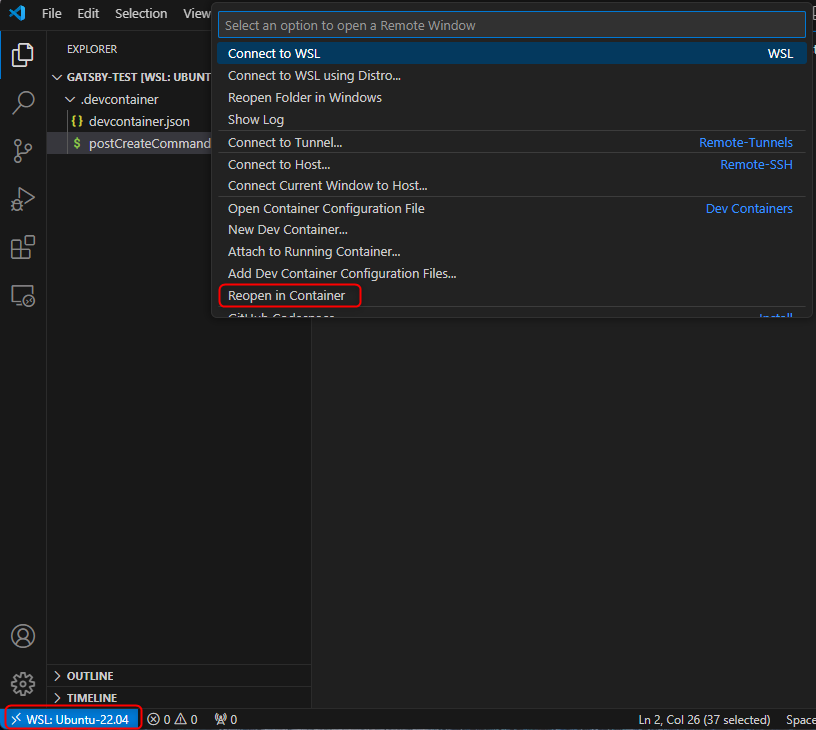
ウインドウの再読み込みが完了するとターミナルが開くので、
Done. Press any key to close the terminal.と表示されたらEnterを押して閉じる。
Gatsbyプロジェクトを作成
新規にターミナルを立ち上げてgatsbyプロジェクトの初期化を実施します。
npm init gatsby -ts各質問に対して以下のように設定する
Ok to proceed? (y) : yを入力
What would you like to call your site?: gatsby-testを入力(何でもよい)
What would you like to name the folder where your site will be created?: (入力せずEnter)
Will you be using JavaScript or TypeScript?: TypeScriptを選択
Will you be using a CMS?: No (or I'll add it later)を選択
Would you like to install a styling system?: Tailwind CSSを選択
Would you like to install additional features with other plugins?: 何も選ばずにDoneを選択
Shall we do this?: yを入力
gatsby-test内のファイルを全て1つ上の改装に移動し、gatsby-testフォルダは削除する
.
├── .devcontainer
├── node_modules
├── src
├── .gitignore
├── gatsby-browser.js
├── gatsby-config.ts
├── package-lock.json
├── package.json
├── postcss.config.js
├── README.md
├── tailwind.config.js
└── tsconfig.json
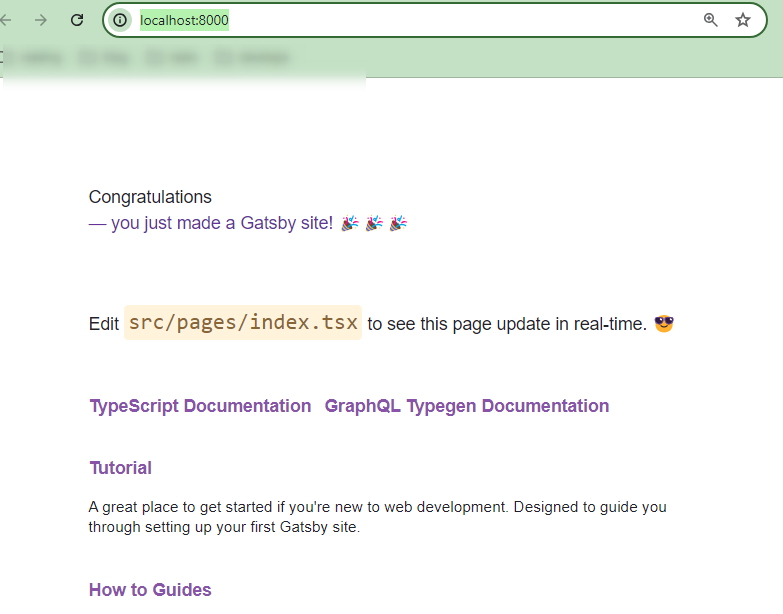
ターミナルに以下を入力してgatsbyをビルドし、開発用サーバーを立ち上げる
gatsby develop -H 0.0.0.0http://localhost:8000/にアクセスして、サンプルページが正常に表示されることを確認する
ターミナルで「Ctrlキー + Cキー」を入力し、開発用サーバーを終了する
デバッグ設定の追加
開発サーバーの立ち上げコマンド等を毎回入力するのは面倒くさいので、デバッグ設定VSCodeから実行できるようにします。
以下のように.vscodeフォルダとlunch.jsonファイルを作成する
.
├── .devcontainer
├── .vscode
│   └── launch.json
└── tsconfig.json
lunch.jsonに以下を追記する
{
  "version": "0.2.0",
  "configurations": [
      {
          "name": "Gatsby develop",
          "type": "pwa-node",
          "request": "launch",
          "program": "${workspaceRoot}/node_modules/.bin/gatsby",
          "args": ["develop", "-H", "0.0.0.0"],
          "env": {
              "PARCEL_WORKERS": "0",
              "GATSBY_CPU_COUNT": "1",
          },
          "runtimeArgs": [
              "--nolazy"
          ],
          "console": "integratedTerminal"
      },
      {
          "name": "Gatsby build",
          "type": "pwa-node",
          "request": "launch",
          "program": "${workspaceRoot}/node_modules/.bin/gatsby",
          "args": [
              "build"
          ],
          "env": {
              "PARCEL_WORKERS": "0",
              "GATSBY_CPU_COUNT": "1",
          },
          "runtimeArgs": [
              "--nolazy"
          ],
          "console": "integratedTerminal"
      }
  ]
}
VSCodeのデバッグから開発用サーバーを立ち上げる
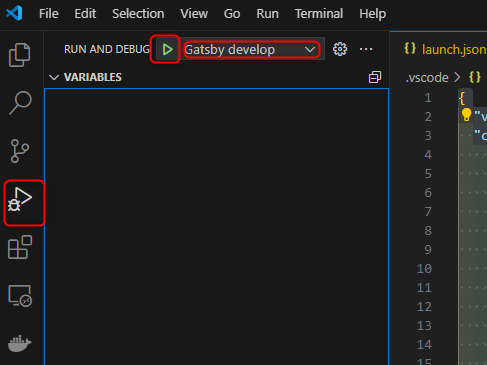
http://localhost:8000/にアクセスできることを確認し、開発用サーバーを終了する

Tailwind CSSの動作確認
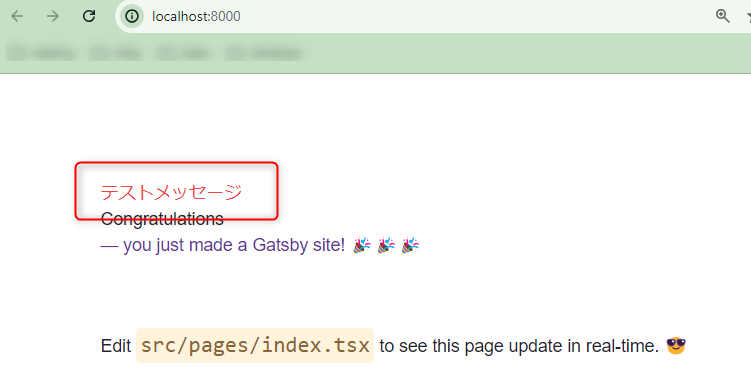
Tailwindの動作確認として、サンプルページに赤い文字を追加します。
VSCodeのデバッグから開発用サーバーを立ち上げて、サンプルページを表示する
ページ上部にtailwindのimport文を追加
import * as React from "react"
import type { HeadFC, PageProps } from "gatsby"
import "../styles/global.css" ←追加
<main style={pageStyles}>の下に以下を追加
<p className="text-red-500">テストメッセージ</p>ページに赤文字でメッセージが追加されることを確認する
まとめ
Dev Container初めて使ってみましたが、とんでもなく便利です・・・!
一回環境作ってgitにでも上げちゃえば他のPCでもWSLとdevcontainerだけ入れれば、すぐに環境構築完了ですね。
GatsbyJS自体については全くの素人なので、何か知見を得られたらまた記事にしようと思います。
あと、今回の手順で不明な点があったら、お気軽にお問い合わせください!
ではでは!
↓Gatsby入門用に以下を買ってみました。
![[商品価格に関しましては、リンクが作成された時点と現時点で情報が変更されている場合がございます。]](https://hbb.afl.rakuten.co.jp/hgb/3d4cd8f8.505f097c.3d4cd8f9.fac6fe29/?me_id=1259747&item_id=14416373&pc=https%3A%2F%2Fthumbnail.image.rakuten.co.jp%2F%400_mall%2Fdorama%2Fcabinet%2Fbkimg%2F2020%2F019%2F34072846.jpg%3F_ex%3D240x240&s=240x240&t=picttext "[商品価格に関しましては、リンクが作成された時点と現時点で情報が変更されている場合がございます。]")